This Weblog describes how to activate the JDBC Connector Service in order to perform database lookups (without JDBC adapter) in XI. The standard how-to guide covers almost all steps but falls short in describing some configuration steps.
This weblog outlines the steps that are required to configure the JDBC Connector service for an Oracle database.
The following reference documents were used; this weblog explains the steps that were missed in those documents.
https://www.sdn.sap.com/irj/sdn/go/portal/prtroot/docs/library/uuid/9aedca11-0d01-0010-3b90-9ea04182875f
http://help.sap.com/saphelp_nw2004s/helpdata/en/b0/6e62f30cbe9e44977c78dbdc7a6b27/frameset.htm
Steps to configure JDBC connector service
1.Download the oracle JDBC driver ojdbc14.jar from the Web site
http://www.oracle.com/technology/software/tech/java/sqlj_jdbc/index.html
2.Use Visual Administrator to upload the ojdbc14.jar against the JDBC connector service.
3.Select the Service node from the list of nodes shown below.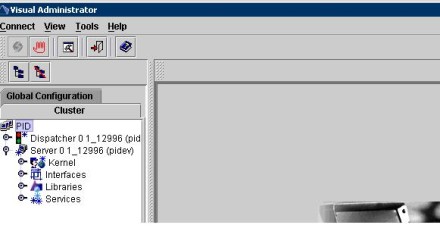
4.Select the JDBC Connector from the list of services.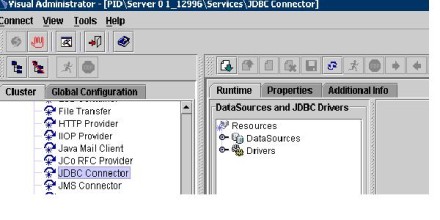
5.Place the cursor in the Drivers node in the Runtime tab. Click the create button to add the drivers.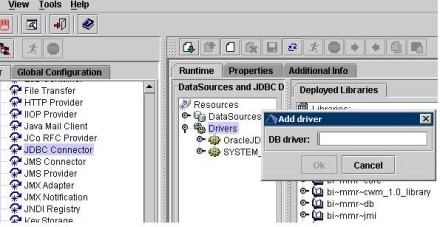
6.Place the cursor in the DataSources to create a new data source.
Enter the following parameters
Application Name
Data source Name
Add alias name ( Do not add jdbc/Name)
since whatever name you add will be registered in the JNDI Registry under jdbc context, while writing the java code access the alias by (jdbc/aliasname).
Subsequently, to check if the alias is registered with JNDI, you can browse to the JNDI Registry node in Visual administrator and locate the alias.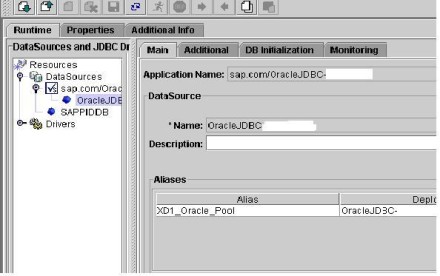
Select the appropriate driver from the list of drivers (from step 5).
Select JDBC Version.
If the version is JDBC 2.0 compliant (Oracle 10.x drivers are compliant), then enter
Object factory - oracle.jdbc.pool.OracleDataSourceFactory
DataSource type – XADataSource
XADS Class name - oracle.jdbc.xa.client.OracleXADataSource

7.Select the additional tab to the enter parameters to connect to the database.
Enter the following parameters:
Key Value url jdbc:oracle:thin:@ user password
SQL Engine : Select Native SQL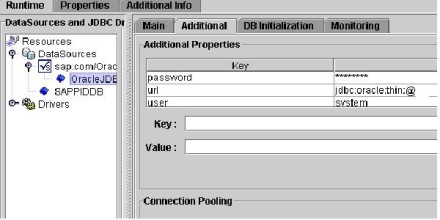
8.How to test the data source to be sure it's working fine
In the DB initialization tab, enter a SQL statement to query the table, & press execute butto; it should return the results.
Do not forget to remove the statement after the test.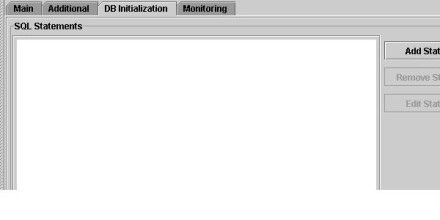
9.Develop Java code that performs DBLookup, the sample code for the performing the DBLook up is given in the How To Guide Appendix.
10.Follow the procedure as given in the how to guide to Create UDF's.
Tuesday, April 15, 2008
Configuring the JDBC Connector Service to perform database lookups
Subscribe to:
Post Comments (Atom)


No comments:
Post a Comment